This tutorial will walk you through setting up a production-ready Laravel Octane application on a minimal Alpine Linux server. We'll use PHP 8.4 and the Swoole server for maximum performance.
This guide is designed for simplicity and focuses on a minimal setup:
- Server: Alpine Linux (lightweight and secure)
- Web Server: Laravel Octane with Swoole (no Nginx or Apache)
- User: root (for simplicity, with security notes)
- Database: None (but we'll install the PHP extensions needed)
🤔 Who is this for?
This guide is perfect for developers who want a high-performance, low-resource Laravel setup, often used in containers like Docker or for specific microservices.
⚠️ A Note on Security: The root User
For simplicity, this guide uses the root user for all commands. In a real-world, publicly-exposed server, it's highly recommended to create a dedicated, non-privileged user for running your application. Using root is more common and safer in isolated container environments.
Step 1: Prepare the Alpine System
First, we need to update our server's package list and install some essential tools.
# Update package lists and upgrade existing packages
apk update && apk upgrade

# Install essential command-line tools
apk add bash curl wget git unzip supervisor nano
What are we installing?
apk update && apk upgrade: Ensures our system is up-to-date with the latest security patches.bash: An improved shell over the default ash.curl, wget, git, unzip: Tools for downloading files and source code.supervisor: A process manager. This is critical because it will automatically restart our Laravel Octane application if it ever crashes, ensuring it's always running.nano: A simple and easy-to-use text editor for configuration files.
Step 2: Enable "Edge" Repositories for PHP 8.4
By default, Alpine Linux uses stable software repositories. Since PHP 8.4 is brand new, we need to tell Alpine's package manager (apk) to also look in the "edge" and "testing" repositories where the latest software versions live.
# Add the edge repositories to our list of sources
echo "http://dl-cdn.alpinelinux.org/alpine/edge/main" >> /etc/apk/repositories
echo "http://dl-cdn.alpinelinux.org/alpine/edge/community" >> /etc/apk/repositories
echo "http://dl-cdn.alpinelinux.org/alpine/edge/testing" >> /etc/apk/repositories

# Refresh the package list to include packages from the new repositories
apk update
Step 3: Install PHP 8.4 and Extensions
Now we can install PHP itself, along with the common extensions that Laravel and many PHP projects rely on.
# Install PHP 8.4 and a comprehensive set of extensions
apk add php84 php84-fpm php84-cli php84-opcache php84-pdo \
  php84-pdo_mysql php84-pdo_sqlite php84-mbstring php84-xml \
  php84-curl php84-zip php84-bcmath php84-intl php84-gd \
  php84-sockets php84-pcntl php84-redis php84-phar php84-tokenizer \
  php84-fileinfo php84-iconv php84-dom php84-simplexml php84-xmlwriter \
  php84-pecl-swoole php84-posix
Why so many packages?
php84: The core PHP engine.php84-pecl-swoole: The Swoole extension. This is the magic that powers Laravel Octane's high-performance server.- Other extensions (
-mbstring,-xml,-pdo, etc.) provide essential functions for string manipulation, database connections, and more that Laravel needs to run correctly.
Step 4: Install Composer (PHP's Package Manager)
Composer is used to manage your Laravel project's dependencies (like Laravel itself, Octane, and other libraries). We'll install it globally so you can use it anywhere.
First, we create a symbolic link (a shortcut) so that typing php in the terminal automatically uses php84.
# Create a shortcut from 'php' to 'php84'
ln -s /usr/bin/php84 /usr/bin/php

# Verify the link works
php --version

# You should see PHP 8.4 output
Now, let's install Composer.
# Download the installer
php -r "copy('https://getcomposer.org/installer', 'composer-setup.php');"

# Run the installer, placing the 'composer' executable in a global location
php composer-setup.php --install-dir=/usr/local/bin --filename=composer

# Clean up the installer file

php -r "unlink('composer-setup.php');"

# Verify the installation
composer --version
Step 5: Prepare Your Laravel Application
Now it's time to get your Laravel project onto the server. We'll clone it from a Git repository.
# Navigate to the root directory
cd /root

# Clone your project from GitHub (replace with your repo URL)
git clone https://github.com/ramaID/hp-laravel-swoole.git

# Enter your project's directory
cd hp-laravel-swoole

# Make SQLite database
touch database/database.sqlite

# Install dependencies for production (no developer tools)
composer install --optimize-autoloader

# Create your environment file from the example
cp .env.example .env

# Generate a unique application key
php artisan key:generate

# Initialize the database and seed it (if you have migrations)
php artisan migrate:fresh --seed
If you have an error about
Allowed memory size exhausted, you can increase the memory limit temporarily by running this command:
php -d memory_limit=-1 artisan migrate:fresh --seedExplanation:
composer install --optimize-autoloader: Installs only the packages for application and optimizes the class autoloader for faster performance.php artisan key:generate: Sets theAPP_KEYin your .env file. This is mandatory for securing user sessions and encrypted data.
Step 6: Install and Configure Laravel Octane
With the project set up, we can now add Octane.
# Run the Octane installation command
php artisan octane:install
When prompted, choose swoole as your desired server. This will add the necessary configuration to your project.
Because we need to run Octane as a background service and running it at memory, we should increase the memory limit in the php.ini file.
# Find the PHP configuration file
php --ini | grep php.ini

# Edit the PHP configuration file
nano /etc/php84/php.ini

# Search for the memory_limit line and change it to:
memory_limit = 1GStep 7: Configure Supervisor to Manage Octane
Supervisor is the program that will keep our Octane server running 24/7. We need to create a configuration file to tell Supervisor what to do.
First, let's ensure Supervisor is looking in the right place for its configuration files. Some Alpine versions have a slightly different path.
# Edit the main Supervisor configuration file
nano /etc/supervisord.conf
Scroll to the bottom and make sure the [include] section looks like this. The d at the end of supervisord.d is important!
[include]
files = /etc/supervisord.d/*.ini
Save the file (Ctrl+X, then Y, then Enter).
Next, create the directory if it doesn't exist and create our Octane-specific configuration.
# Create the config directory
mkdir -p /etc/supervisord.d

# Create and edit our Octane service file
nano /etc/supervisord.d/octane.ini
Paste the following configuration into the file.
[program:octane]
command=php artisan octane:start --server=swoole --host=0.0.0.0 --port=8000
directory=/root/hp-laravel-swoole
user=root
autostart=true
autorestart=true
stdout_logfile=/root/hp-laravel-swoole/storage/logs/octane.log
redirect_stderr=true
What do these lines mean?
command: The exact command to start Octane. We use--host=0.0.0.0to make it accessible from outside the server (not just localhost).directory: The full path to your Laravel application.user: The user that runs the command (in our case, root).autostart=true: Starts the Octane server when Supervisor starts (e.g., on system boot).autorestart=true: If the Octane process crashes for any reason, Supervisor will automatically restart it. This is key for production.stdout_logfile: Where to write the application's output log. This is useful for debugging.redirect_stderr=true: Puts any error messages into the same log file.
Step 8: Launch and Verify ✅
Now, let's enable and start Supervisor, which will in turn launch our Octane server.
# Enable the Supervisor service to start on boot
rc-update add supervisord

# Start the Supervisor service now (or restart to apply new config)
rc-service supervisord restart

# Check the status of our 'octane' process
supervisorctl status
You should see an output indicating that the octane process is RUNNING:
octane RUNNING pid 1234, uptime 0:00:15If it says FATAL or EXITED, check your log file for errors:
tail -f /root/hp-laravel-swoole/storage/logs/octane.logStep 9: Access Your Application
Your high-performance Laravel application is now running! You can access it in your browser.
Firewall Note: Alpine Linux does not have a firewall enabled by default. However, if you are using a cloud provider (like AWS, Google Cloud, DigitalOcean), you will likely need to open port 8000 in their firewall/security group settings to allow external connections.
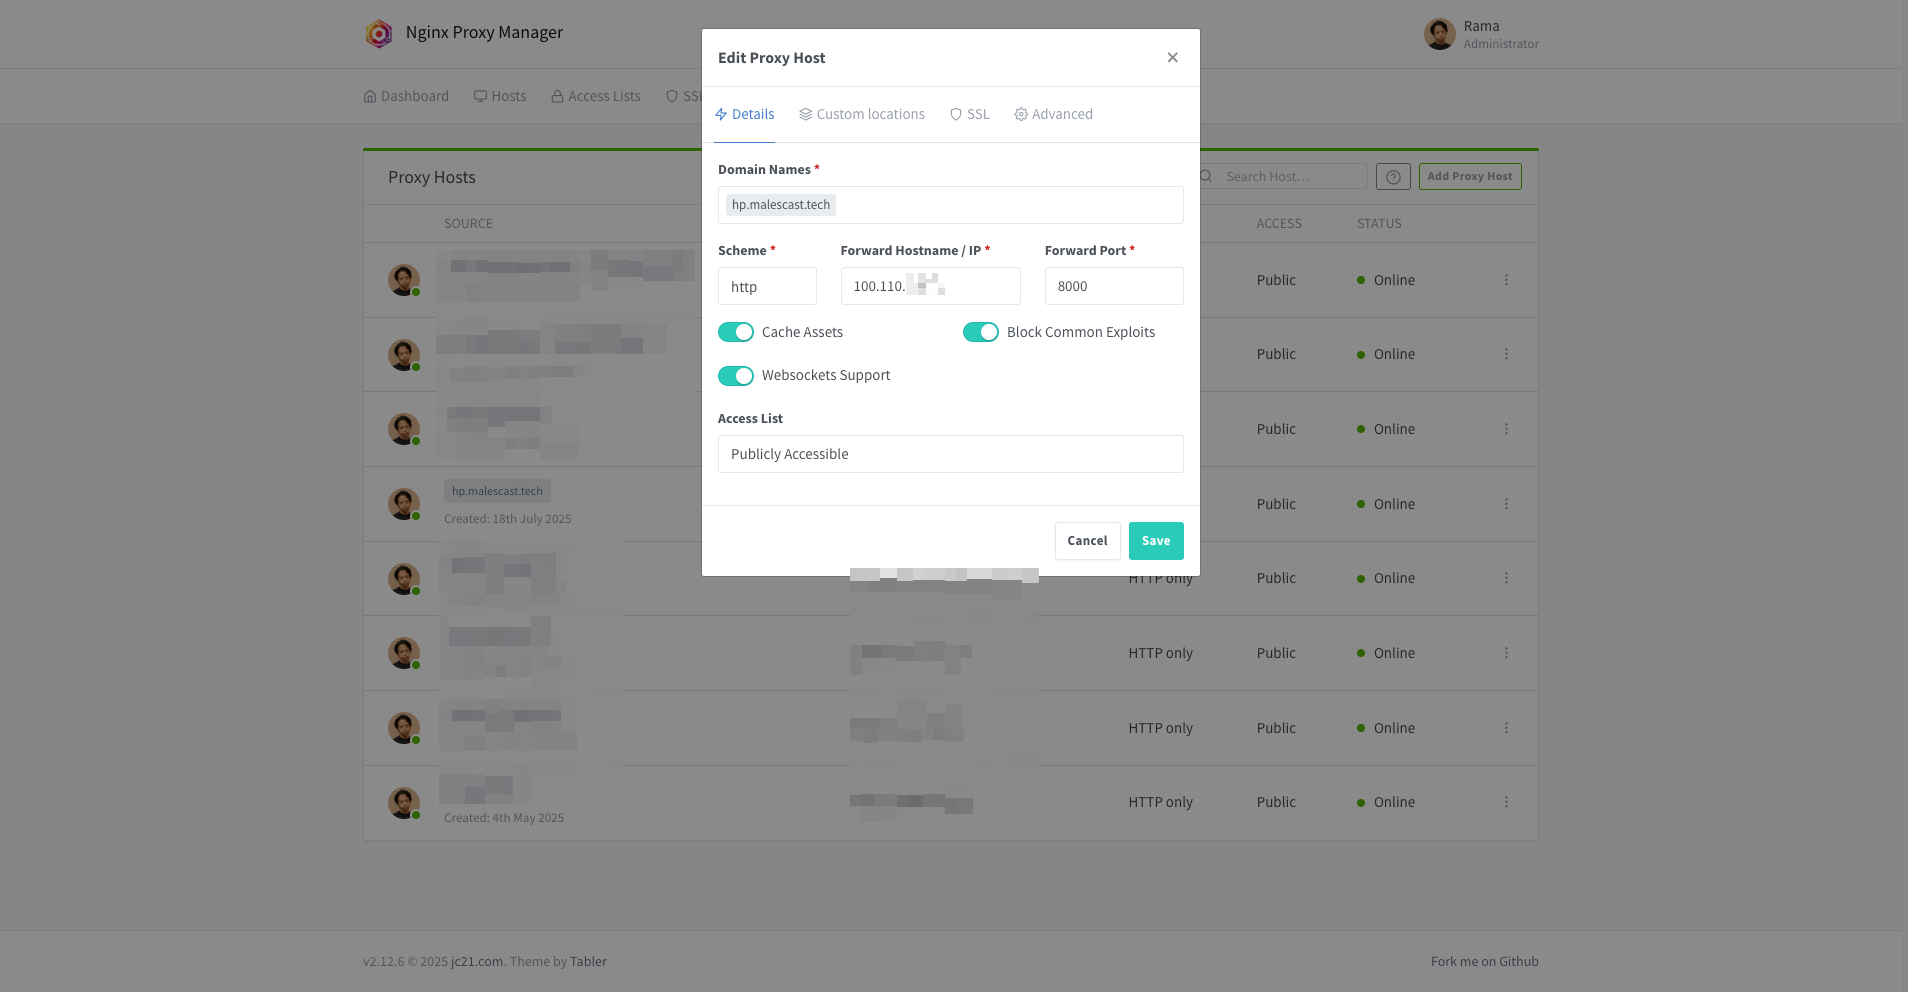
Because I'm having proxy server, here's my configuration to access the application:
Step 10: Maintenance and Next Steps
Here are some common commands you'll use to manage your application.
-
Change
.envsettings:nano /root/hp-laravel-swoole/.envFor example, to set the environment to production, you might change:
APP_ENV=production APP_DEBUG=false APP_URL=https://hp.malescast.tech -
Save config for more persistent with this command:
php artisan optimize -
View Logs in Real-time:
tail -f /root/hp-laravel-swoole/storage/logs/octane.log -
Restart Octane (after a code change):
supervisorctl restart octane -
Update Your Application Code:
cd /root/hp-laravel-swoole
git pull
composer install --no-dev --optimize-autoloader
supervisorctl restart octane
Where to Go From Here?
- Use a Non-Root User: For better security, create a new user and configure sudo.
- Set up a Reverse Proxy: Use Nginx or Caddy in front of Octane to handle SSL (HTTPS), domain names, and serve static assets more efficiently.
- Configure a Database: Edit your .env file with your database credentials.
- Automate Deployments: Look into CI/CD pipelines using GitHub Actions or GitLab CI to automate your update process.
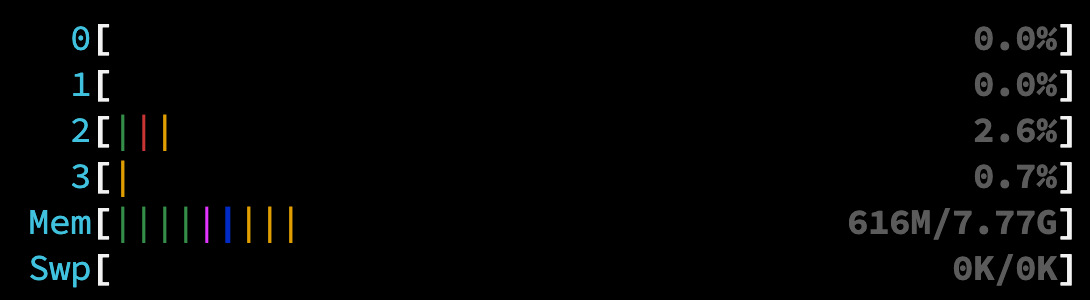
Memory Usage
Here's a quick look at memory usage for this setup, running supervisorctl stop octane we got this:
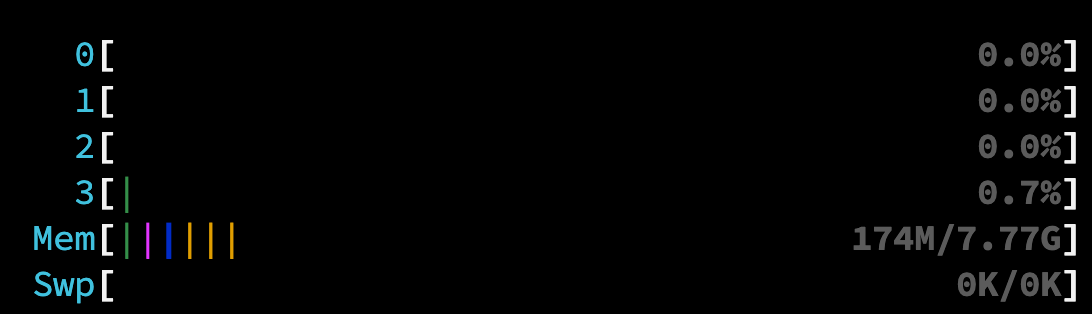
After running supervisorctl start octane, memory usage is: